

A few years ago, I got this idea for classroom rewards and have been saving leftover crayons. At the end of last school year, our district came down with a new rule that said we can no longer give out any candy. I suddenly got motivated to put my plan in place and made these classroom rewards that my students love!
Reasons for using classroom rewards
Every year, I have a theme of the year and my student of the day sits on my VIP chair and gets special privileges, such as leading games and helping the teacher. They used to get a piece of candy. They will now get one of my molded crayons! Check out my post about my VIP chair.
Any teacher can make these wonderful molded crayons for their classroom. Since I am a music teacher with over 500 students, I definitely have my work cut out for me.
I also do a raffle for my 5th and 6th-grade classes and choose a couple of tickets a day. It is amazing how much students learn and how many things they will do, such as sing a solo to earn a raffle ticket. They used to get candy and will now get a molded crayon! Read about and get my superhero raffle system free here.
I have streamlined my molded crayon making system. Hopefully, my trial and error will help you avoid some problems.
STEP ONE: Gather or buy crayons
First, gather crayons from teachers who don’t need them anymore, friends in your neighborhood, local restaurants, etc. I have found that Crayola crayons are much easier for getting off the paper. You can also buy crayons. Back-to-school sales are the best. Back-to-school sales are a great time to get new crayons. In the last couple of weeks, I found Crayola boxes of 24 crayons for .50 at Target and Walmart and an off-brand for only .25 a box, but the paper is harder to get off.
EDIT: I actually got a donor’s choose grant for 250 boxes of crayons this year.
STEP TWO: Get silicone molds
I have gotten carried away and bought a number of molds. There are tons of them on Amazon, eBay, and Etsy.
Here are some of the ones I bought:

Places where I got molds
Edit: Since I posted this, some of these items are out of stock, so go to eBay, amazon.com, and Etsy and search for silicone molds to find some fun ones. I did buy some really inexpensive ones from china that ended up being super tiny and wouldn’t work, so be sure to check the size of the mold in your description. If you have funds, people on Etsy sell these molded crayons as well.
***IMPORTANT- Even if a mold says silicone, be sure to check to see that it will work in an oven. I found two molds that said silicone that melted. When I went back to look at the description, it said not to put them in the oven.
Lego Molds (affiliate link)
Dinosaur Mold
Skull and Crossbones
Animals (bear, hippos, lion)
Guitars
Treble Clefs – From eBay but now out of stock
Hearts- I can’t remember where I got these. It might have been Walmart or Hobby Lobby. If you look online, you can find them in other places.
STEP THREE: Sort crayons into like colors
I have found that kids love to do this. If you have huge numbers of used crayons, have them sort them into similar colors. Then sort further into more precise colors and put them into ziplock baggies.

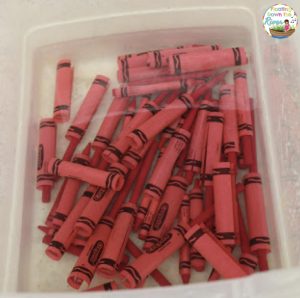
STEP FOUR: Take the paper off of the crayons
This is probably the most challenging step if you have used crayons, but I have some tips for you. First, if you put them into very warm water (not too hot or they’ll melt all over). If you have new Crayola crayons, most of the papers will just come off and for others, just slide the paper down with your fingers. That will take off the glue.
For used crayons, many will come off with warm water but some will be harder. I have been getting the easiest ones and then dumping the water and getting more warm water. It is definitely more challenging. The few ones- usually an off-brand of crayons- that are almost impossible, I throw away because I am doing such a high volume, I don’t have time. I have a plastic tub to put my crayon paper in. Then I dry them all and put them back into the ziplock baggie.
I invited a few choir students to come and help with this. They had a blast and even had races to see who could do it the fastest!
Step 5: Cut them into small pieces
I first started using scissors, which didn’t work well, and then tried a large Exacto knife. It worked better but my husband found the best way. It is a utility knife we’ve had forever with a razor blade. I looked online and found a U-Line knife. He just chopped straight down on them using a cutting board and he was able to do it so quickly!

U-Line Utility Knife with Razor Blade

STEP SIX: Put the crayon pieces in molds
Put the crayon pieces in molds and put them onto a cookie sheet. I put several molds in at a time. I have found that for me since I am making large amounts of these, I put in all of the same colors at a time. At first, I was chopping and putting varied colors in the same mold. It ended up mixing up the colors a little bit. If the pieces are already cut, you could probably do varied colors in one mold and it would work fine. The smaller molds take only 1 crayon. The larger ones, such as the skull and crossbones take 2 crayons if you want to fill them up, but you could definitely do only one and they will just be thinner.

STEP SEVEN: Put the molds in the oven
Preheat your oven to 250 degrees and bake for 15-20 minutes. When you look at the melted crayons, they should be totally liquid. If you see any lumps, leave them in for a little bit longer.
STEP EIGHT: Let cool and remove from the mold
Be sure to let them totally cool. If I get impatient, I stick them in the fridge to cool. Be careful getting them out of the molds. Most of them were easy. The guitars were easy to break the neck, but once I figured out how to get them out, it wasn’t too hard. I had to be careful with legos to be sure the top pegs don’t come off. Again, be sure they are totally cool.


Step Nine: Clean up the Mess
I would immediately clean up your mess of the little bits of crayons that chip off as you are cutting. I didn’t clean up right away and we had company coming. My husband used our steamer on the floor and it left small crayon streaks. I just used a Mr Clean “Magic Eraser” to easily get it off. Also, let your molds sit in very warm water for a few minutes and then wash your molds off. Another trick is to put them back into the oven to let the leftover bits melt and then clean them off. I would use a little scrub brush (not too rough) if you have one. You want the mold to be pretty clean before you put another color in it.
EDIT: We have found that getting a box lid, putting parchment paper (newspaper would work too) under the cutting board, and then cutting that makes a big difference to keep the mess down.
STORAGE IDEA for your Classroom Rewards
I intend to let my students choose a molded crayon, so I put them into a set of drawers I already had in the classroom. I also found a smaller one with drawers that students can choose from.


Enjoy Giving your Molded Crayons as Classroom Rewards!
Once you are done making your crayon classroom rewards get ready to enjoy watching your students’ reactions! Edit: I am now a few weeks into school. The kids absolutely LOVE these, even my 6th graders. They treasure them and show them to other students. Other teachers and administrators are telling me how much the kids love them. It is a big hit. I just ordered a Pikachu mold on amazon. Get it here.


 Taking My Travels Back to the Students: Canoe Song and Land of the Silver Birch

Great idea. Thanks for sharing. I will have to put a bin out for broken crayons this year instead of throwing them away.
Thanks! I asked the other teachers for their old crayons and got tons of them!
I watched/read a story about a guy that collects crayons and uses them to make new crayons for low income kids needing supplies. He just melts the crayons with the papers on them and scoops the papers out before pouring the wax into the molds. Might be worth trying on those pesky cheaper crayons.
Interesting to melt and pour. I wonder how hard that is. It may be worth it for those pesky brands that are hard!
Great idea!
Thank you!
Love this idea! These are sure to be a hit with the kids. Thanks for sharing all the steps and the tips!
I am very excited for them to see them and I have gotten the process buzzing along so it is easier to make tons of them for my tons of students.
Awesome idea! Candy can be so expensive when you teach so many students.
Thank you! Yes, candy is very expensive!
I see people do this and I always wonder if it actually works- glad to know it does! 🙂 I'm sure your kids will love these!
I am actually having a lot of fun doing this! Thanks for reading!
This is a fantastic idea! Love it!! THanks for sharing!
Thanks you and thank you for reading!
Linda, I love how you are rewarding the students with something besides food! I know the students will appreciate your hard work in making these adorable and relevant awards! Thanks for the tutorial!
I really do think they will appreciate these! Thanks for reading!
I LOVE this idea!! I feel guilty giving candy sometimes, and the dollar store items break so easily!
We will be fined if we give out any candy, so I had to come up with something. Thanks for reading!
These are terrific, Linda! I love that you're killing 2 birds with one stone- prizes for your classroom and recycling used supplies. So, so cute!
Thanks Lauren! It is a lot of fun but also a lot of work when you have over 500 kids. I do crazy things for my kids but they love it!